
🔥Building a Teams Bot with AI Capabilities - Part 2 - Register and Testing in Azure w/ Teams Developer Portal🔥
aka, json juggling, manifest mangling, error exasperation

This blog series focuses on presenting complex DevOps projects as simple and approachable via plain language and lots of pictures. You can do it!
These articles are supported by readers, please consider subscribing to support me writing more of these articles <3 :)
This article is part of a series of articles, because 1 article would be absolutely massive.
Part 2 (this article!): Register Bot in Teams with Teams Developer Portal
Part 3: Delegated Permissions and Making Lambda Stateful for Oauth2
Part 4: Building the Receiver lambda to store tokens and state
Hey all!
In the last article we covered how to register a Teams Bot resource in Azure, and link it to an App Registration, which grants it permissions and the ability to look up information. You would think, since you’ve registered a Teams Bot resource, and linked it to the Teams “channel”, that your Bot is now present in your Teams app. You’d be wrong.
Instead, there’s one more (surprisingly complex, poorly documented) step.
Testing your Bot in Teams, and then submitting it to your Org for use!
There’s a few different ways to do this - via the Teams App, or via the Teams Developer Portal. Regardless, we’re going to need a Manifest .
If you don’t care about reading how we built it, and would rather just read the code, it’s open-sourced here. Happy building!
Write an App Manifest
No matter our path forward, we need an “App Manifest”. This assigns a bunch of values we care about. Lets walk through the sections.
We’re going to be walking through this file in this section.
Lets walk through this line by line.
Line 2 - the schema. This is a well-defined standard from Microsoft. We’re using version 1.19. There are newer versions, but 1.19 should be supported for a good long time.
Line 3 - the version. This is our version that we control. We can publish new versions that can be published by the enterprise admin at our company as we develop the bot. Note that we can publish new code on our lambdas tons without rev’ing this, this is just for the “App” config in Teams.
Line 4 - Same manifest version
Line 5 - A GUID ID for our bot in our enterprise. It must be unique in our Org. It can’t change for new versions of the bot released in our Org. You can use any number of free tools to create a GUID for your bot.
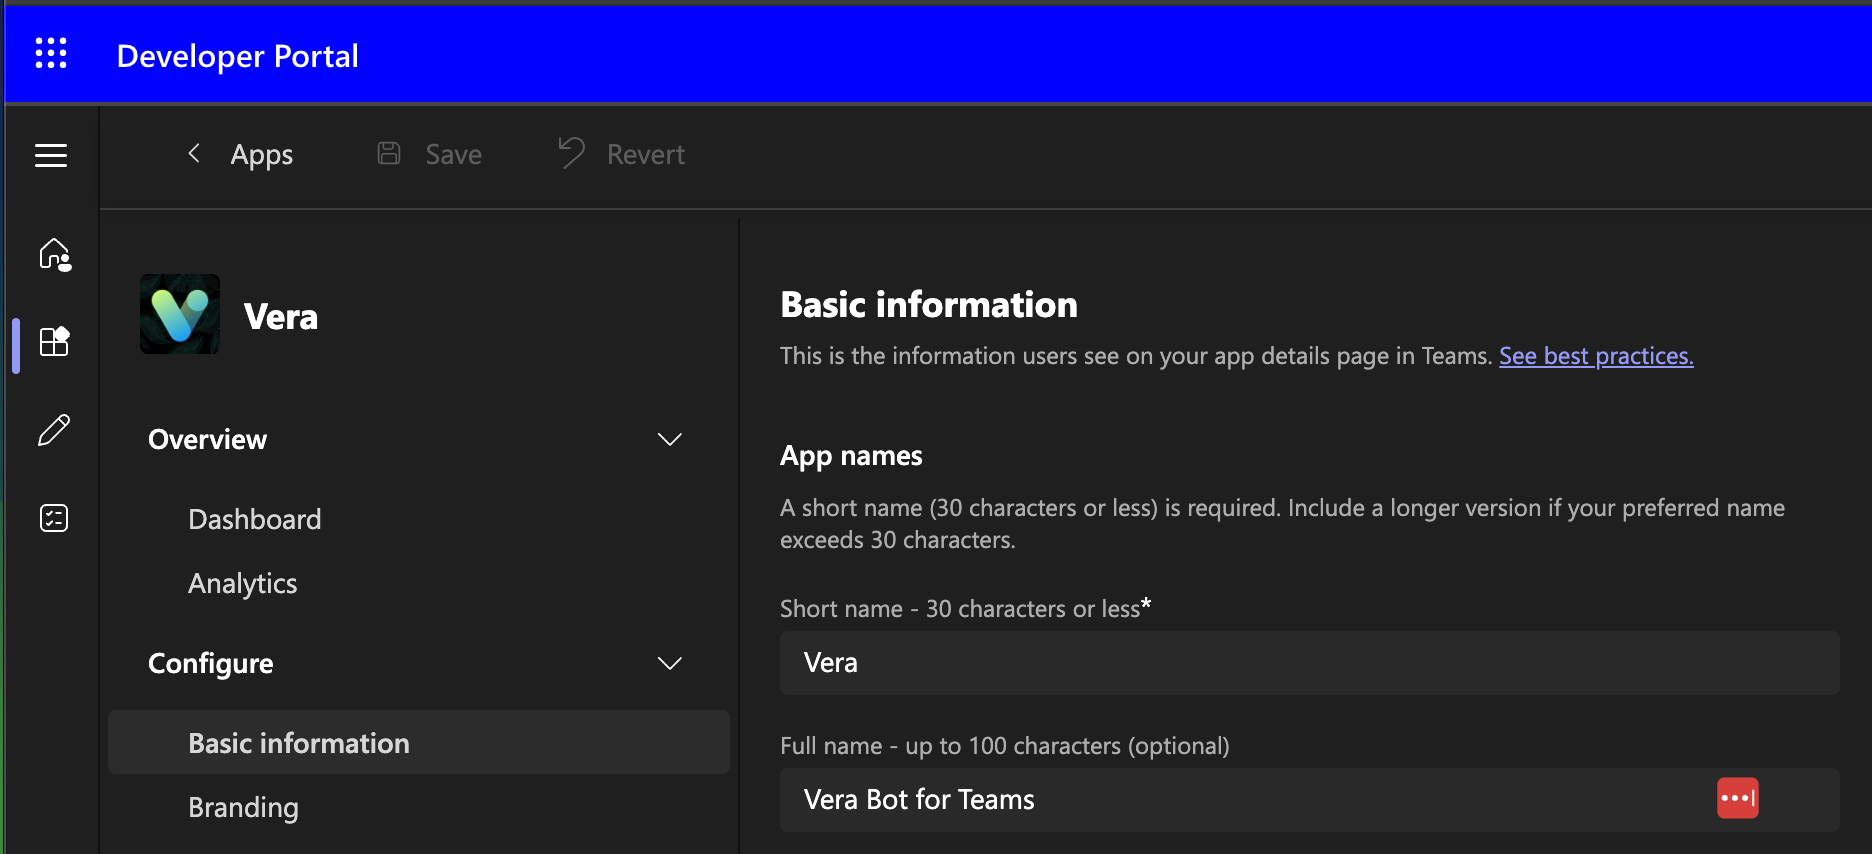
Line 7, 8 - These are the names that the Bot will be seen as in Teams, and the “full” is the hover-text.
| { | |
| "$schema": "https://developer.microsoft.com/en-us/json-schemas/teams/v1.19/MicrosoftTeams.schema.json", | |
| "version": "1.0.0", | |
| "manifestVersion": "1.19", | |
| "id": "06a349bb-8c24-44bb-9f57-c0a0bf7bcfaa", | |
| "name": { | |
| "short": "Vera", | |
| "full": "Vera Bot for Teams" | |
| }, |
Next up, the developer information. Line 2 is your name, and lines 3 - 5 are required (!) but don’t have to be valid. Set them to google if you want. I set them to an internal wiki page where I put information about the bot.
Line 8 and 9 are a description that’s shared with users of the bot.
| "developer": { | |
| "name": "Your Name", | |
| "websiteUrl": "https://your-site-url.com", | |
| "privacyUrl": "https://your-site-url.com/privacy", | |
| "termsOfUseUrl": "https://your-site-url.com/terms" | |
| }, | |
| "description": { | |
| "short": "Vera is an AI assistant", | |
| "full": "Vera is an AI assistant that helps you with your tasks. Vera has read much of our internal data, and can help you understand policies and do your work." | |
| }, |
Next up, the icons. You’d think, particularly with how easy this works in Slack, that this would be easy, but oh goodness, you’d be wrong.
Let’s talk about that in a minute. For now, this is the exact name (and capitalization) of the files in the zip we’ll create in a minute.
We need an outline file that’s very small and exclusively black and white (outline.png) which is used for the far-left Teams shortcut to trigger the App, and we’ll also need a full color (color.png) 192x192 icon that’s displayed as the App’s color tile in chats.
| "icons": { | |
| "outline": "outline.png", | |
| "color": "color.png" | |
| }, |
Next up, the accent color on line 1. This is a hex color designation, and you can use more online free tools to pick a color.
Next up, on line 2, the bots section. We are just going to use a single bot, but we need to specify the real Bot client ID here.
The botId (line 5) and id (line 21) must match, and must be exactly the client ID for your App Registration in your Teams Tenant.
Line 6 specifies the scopes we want our bot to work in - personal chat (1:1), team chat (Team with Channels/Posts), and group chat (multiple members, private chats).
The next few bool flags are pretty straightforward. Line 11 - false, it’s not just for notification (it does chatting, duh), line 12, does it do audio calling (no), line 13 does it support video (no), and line 14 does it support files, yes absolutely.
Last but not least, line 17. This validDomains attribute is marked as “optional” in the API spec, and it is when your App is in single-user mode, but it is absolutely required to publish your App in your Organization. You can use wildcards (as shown here) or specify exactly the domain that webhooks will be sent to in your Org.
| { | |
| "accentColor": "#FFFFFF", | |
| "bots": [ | |
| { | |
| "botId": "b082f92f-d90e-4694-bd76-112d55bc1220", | |
| "scopes": [ | |
| "personal", | |
| "team", | |
| "groupChat" | |
| ], | |
| "isNotificationOnly": false, | |
| "supportsCalling": false, | |
| "supportsVideo": false, | |
| "supportsFiles": true | |
| } | |
| ], | |
| "validDomains": [ | |
| "*.lambda-url.us-east-1.on.aws" | |
| ], | |
| "webApplicationInfo": { | |
| "id": "b082f92f-d90e-4694-bd76-112d55bc1220" | |
| } | |
| } |
Building Outlines and Logos
This part is straight up obnoxious. I don’t care about logos, and at points I’d have taken any default logo at all. Instead, the Teams tool requires you provide exactly formatted (size, color depth, resolution) photos.
Rather than having some type of tool that would just generate these images, they require you to go learn about color depth in order to create a bot.
BIG SIGH
I don’t have a good suggestion for you on this - I asked chatGPT about 12 times to build them, and eventually it worked. If you have a photoshop smart friend, that’d be even better.
Here are the images I ended up with.
Here’s the color.png file (make sure it’s named exactly that and in the same folder as the manifest.json file). This is used for the photo tile when users are interacting with the bot.
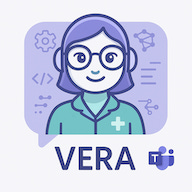
And this teeny tiny outline.png (again, must be named exactly that and in the same folder as the manifest.json). This is used as a tiny picture when users are picking the bot from the far-left of teams desktop (where Activity, Chat, Teams, etc. are located).

Zip it Up
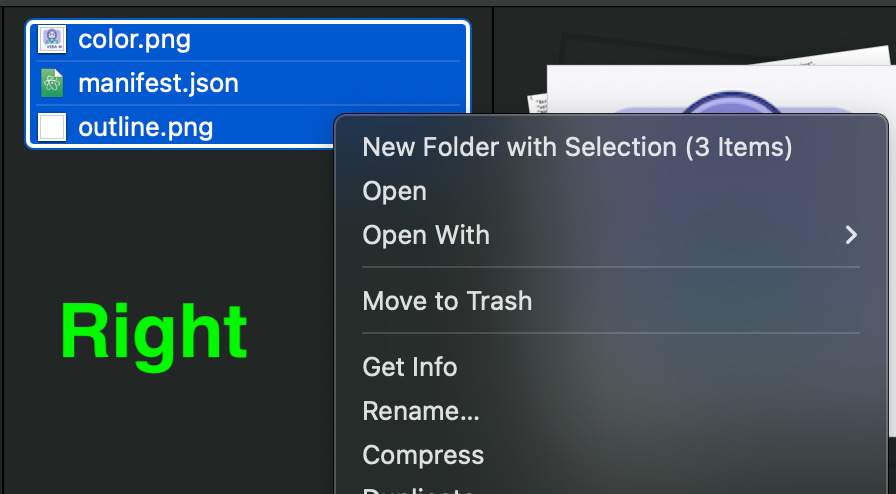
You’d think there’d be a web form where you’d provide these three things. You would be wrong. You’re required to zip them up.
And I failed for half an hour because I clicked “compress” in mac on the folder these files are in.
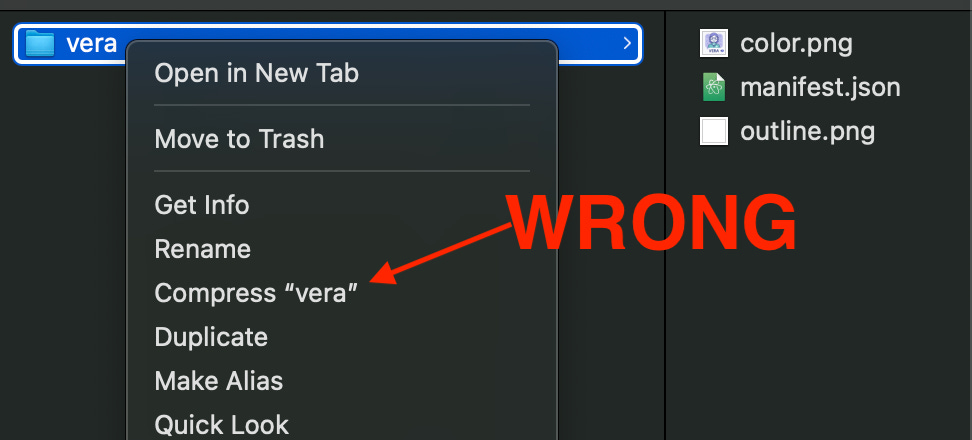
Instead, you have to highlight the specific files, and then right click on them, to create the zip file. Otherwise the Teams App will give you non-specific and annoying errors that just tell you the files can’t be found since it won’t recursively read your zip file.
Method 1: Upload to Teams
This isn’t the method I recommend, but including for completeness. Skip to the next section for what we will do.
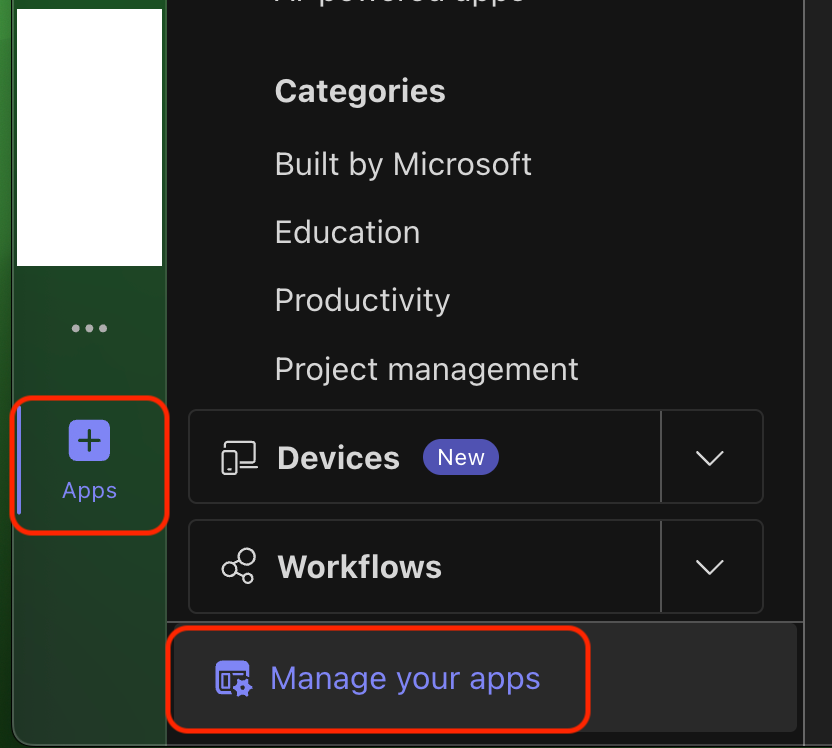
Start from your Teams app on your computer. Over on the far left, click on “Apps” (usually at the bottom), and then on “Manage your apps”.
If you don’t see “Apps” with the plus, make sure you’re in an enterprise. There is a license requirement to use this tool, personal Teams accounts can’t.
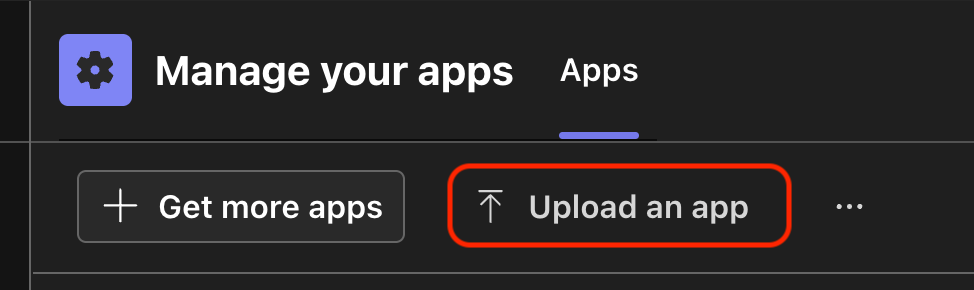
Next, “Upload an app”.
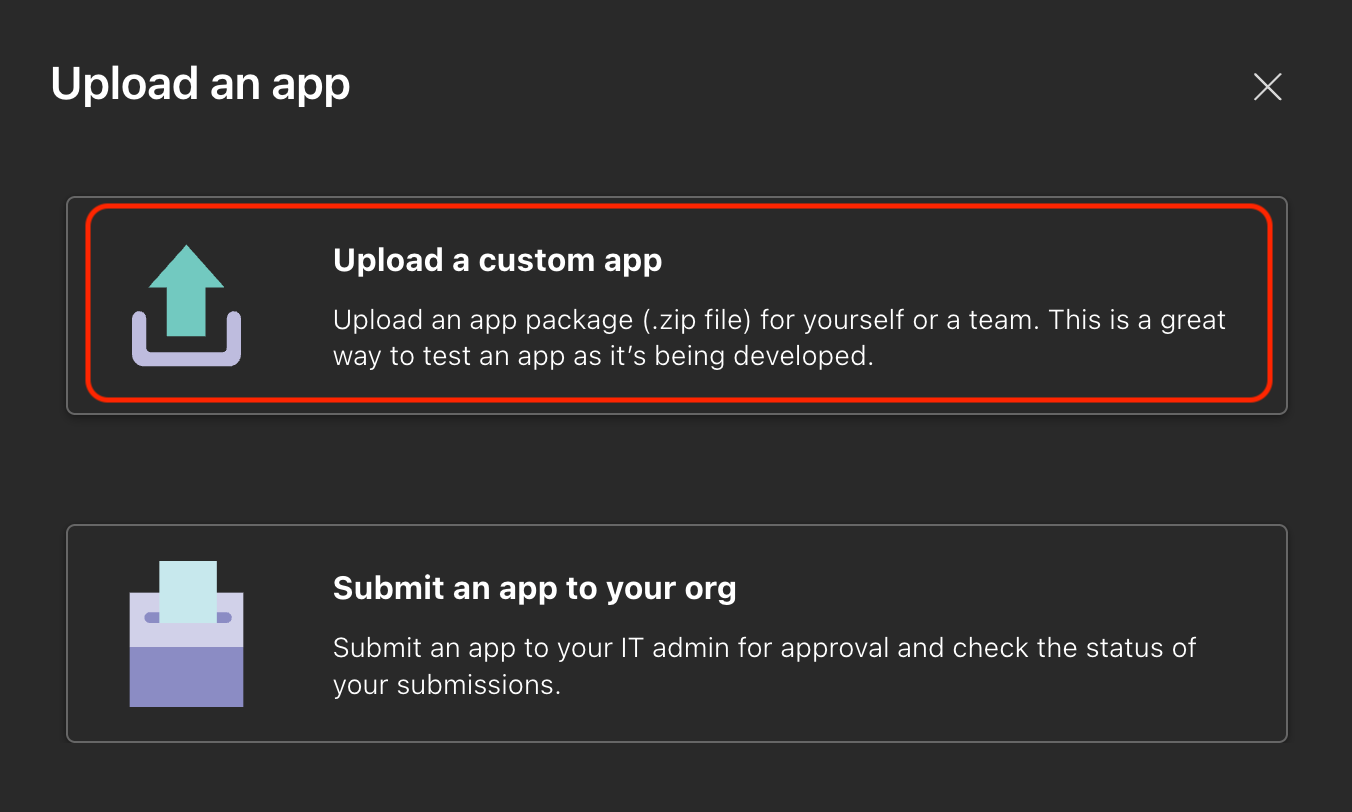
Then, “Upload a custom app”.
Notably, the second option is how you can submit an App to your Enterprise Admin for approval in the enterprise, but it isn’t how we’ll proceed.
If the Archive file you picked is accepted, it’ll work and let you use it. If not, you’ll get an error like this:
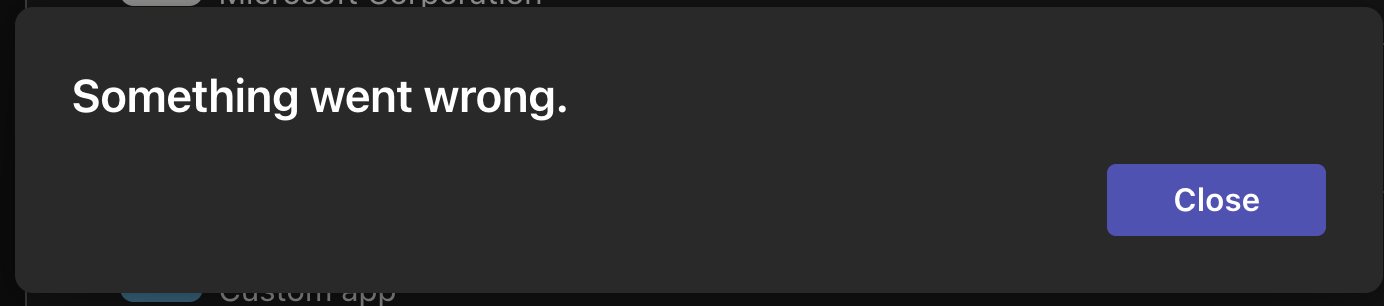
That’s not helpful at all, right? What went wrong? No errors?
Thankfully, there’s a better way - the Teams Developer Portal. Lets switch to this and we can see what’s going wrong.
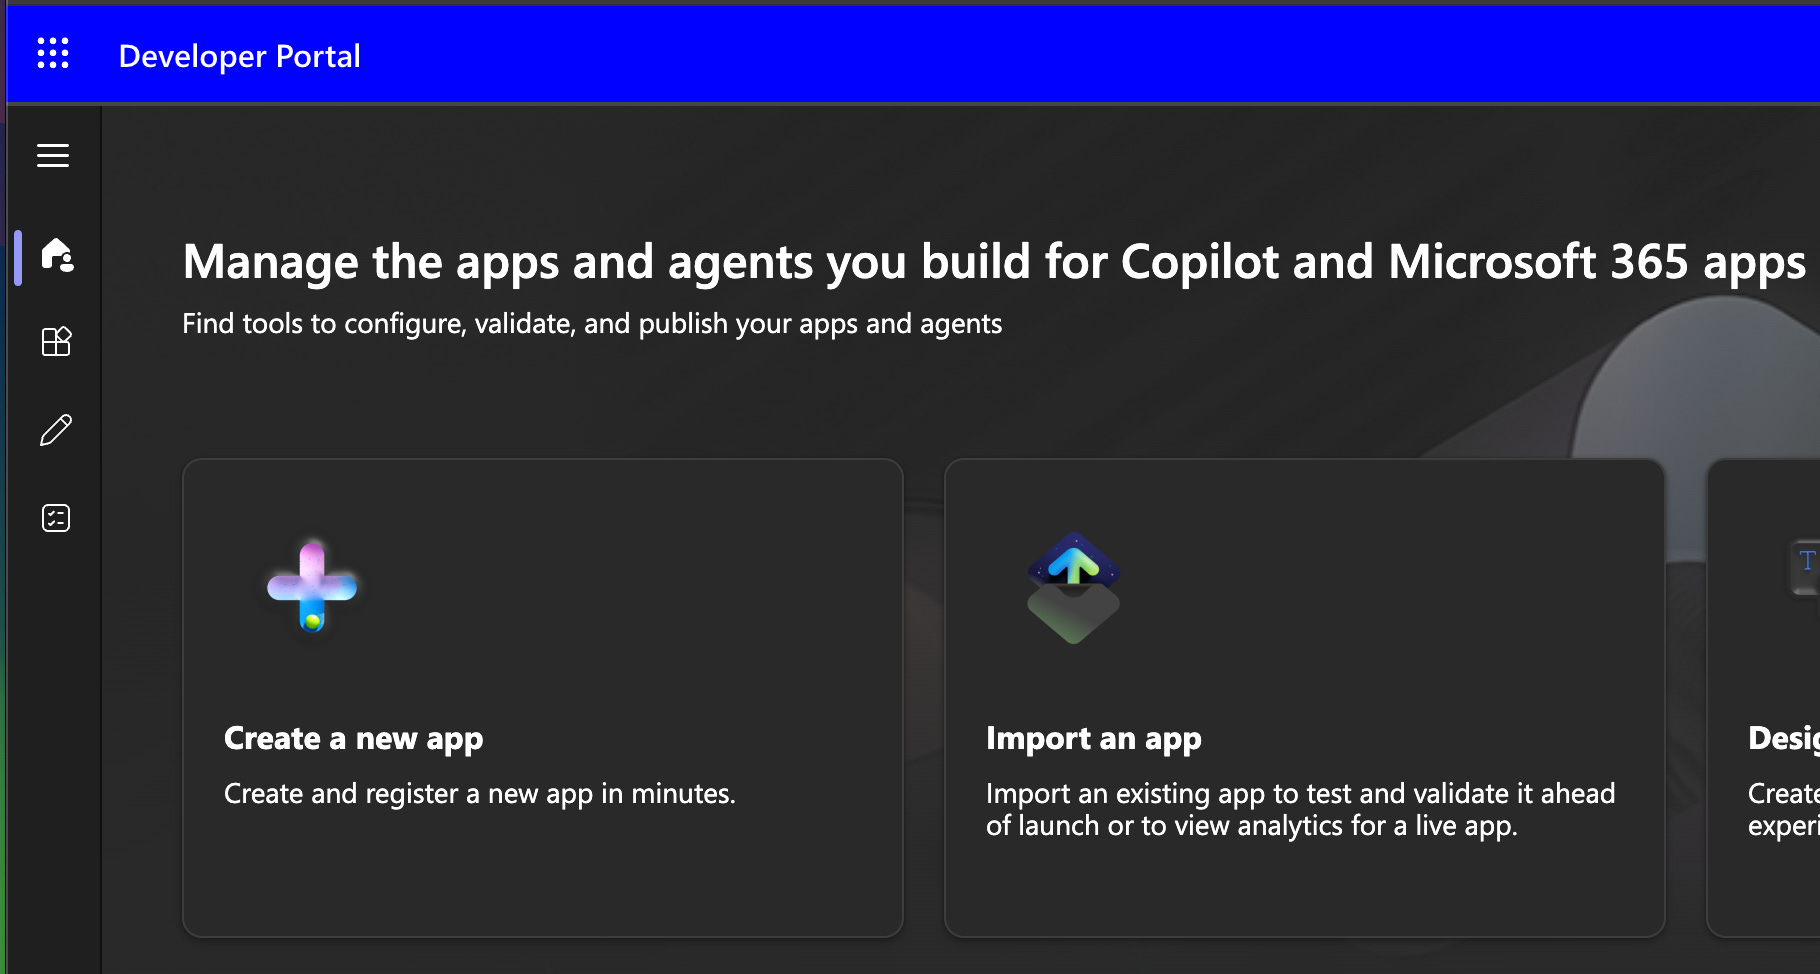
Method 2 (way better): Teams Developer Portal
You can find the Teams App Development portal here: https://dev.teams.microsoft.com/home.
This is a portal that exposes the same functionality as we just saw in Teams, but has way (WAY) better error handling, by which it has any type of error handling whatsoever.
Let’s go to the Teams Developer Portal, and click “Import an app” and find the same zip file we just created.
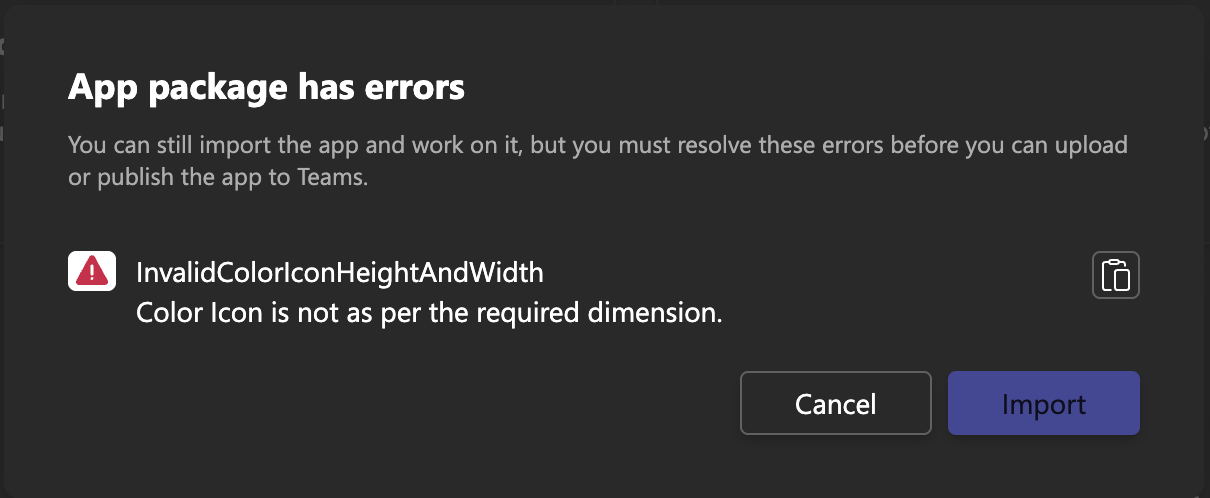
Hey, an error message! That’s awesome, we can at least know what’s wrong. You can cancel and address or (what I recommend), Import anyway.
Click on Import to move forward.
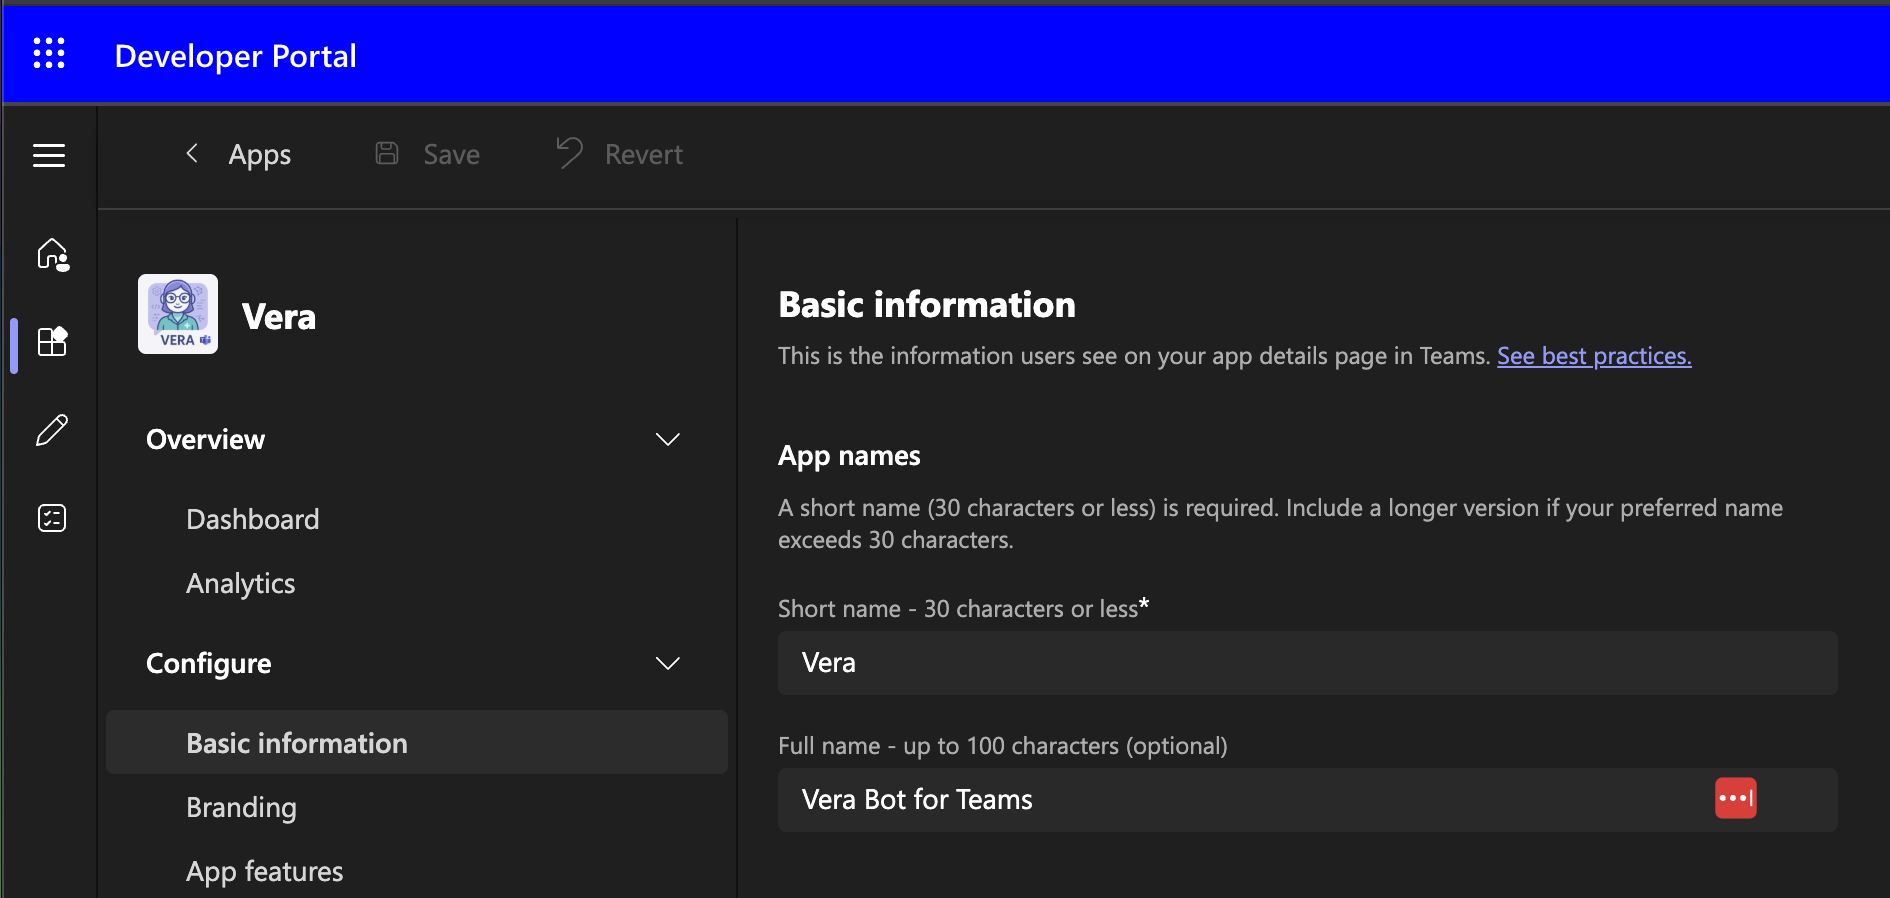
You’ll see your App imported now. It’s not yet published (we haven’t fixed the error yet). You can click through the panes and verify all the settings. Feel free to make any changes you need here on this page, or on any of the “Configure” pages.
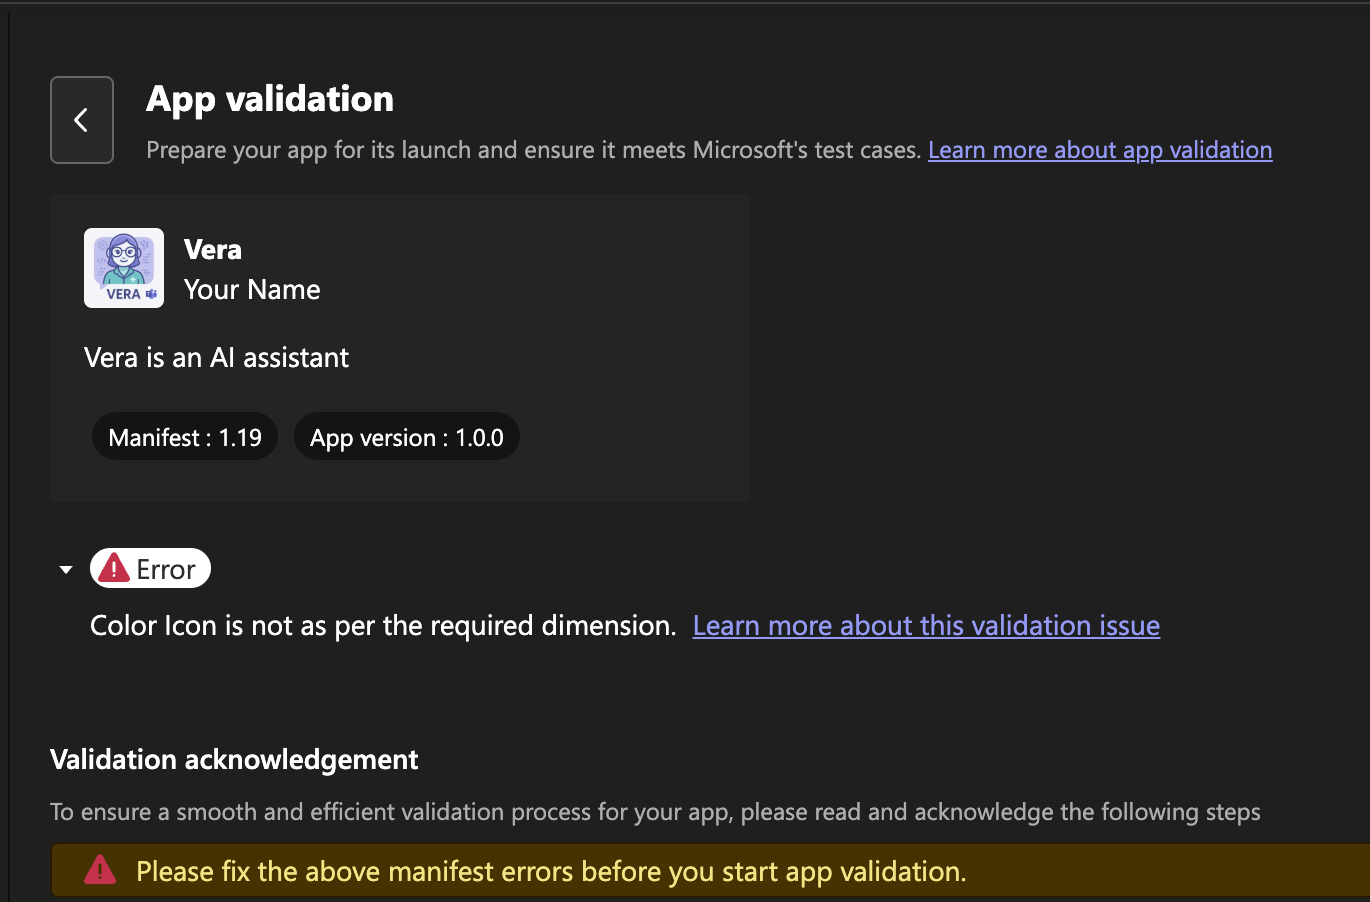
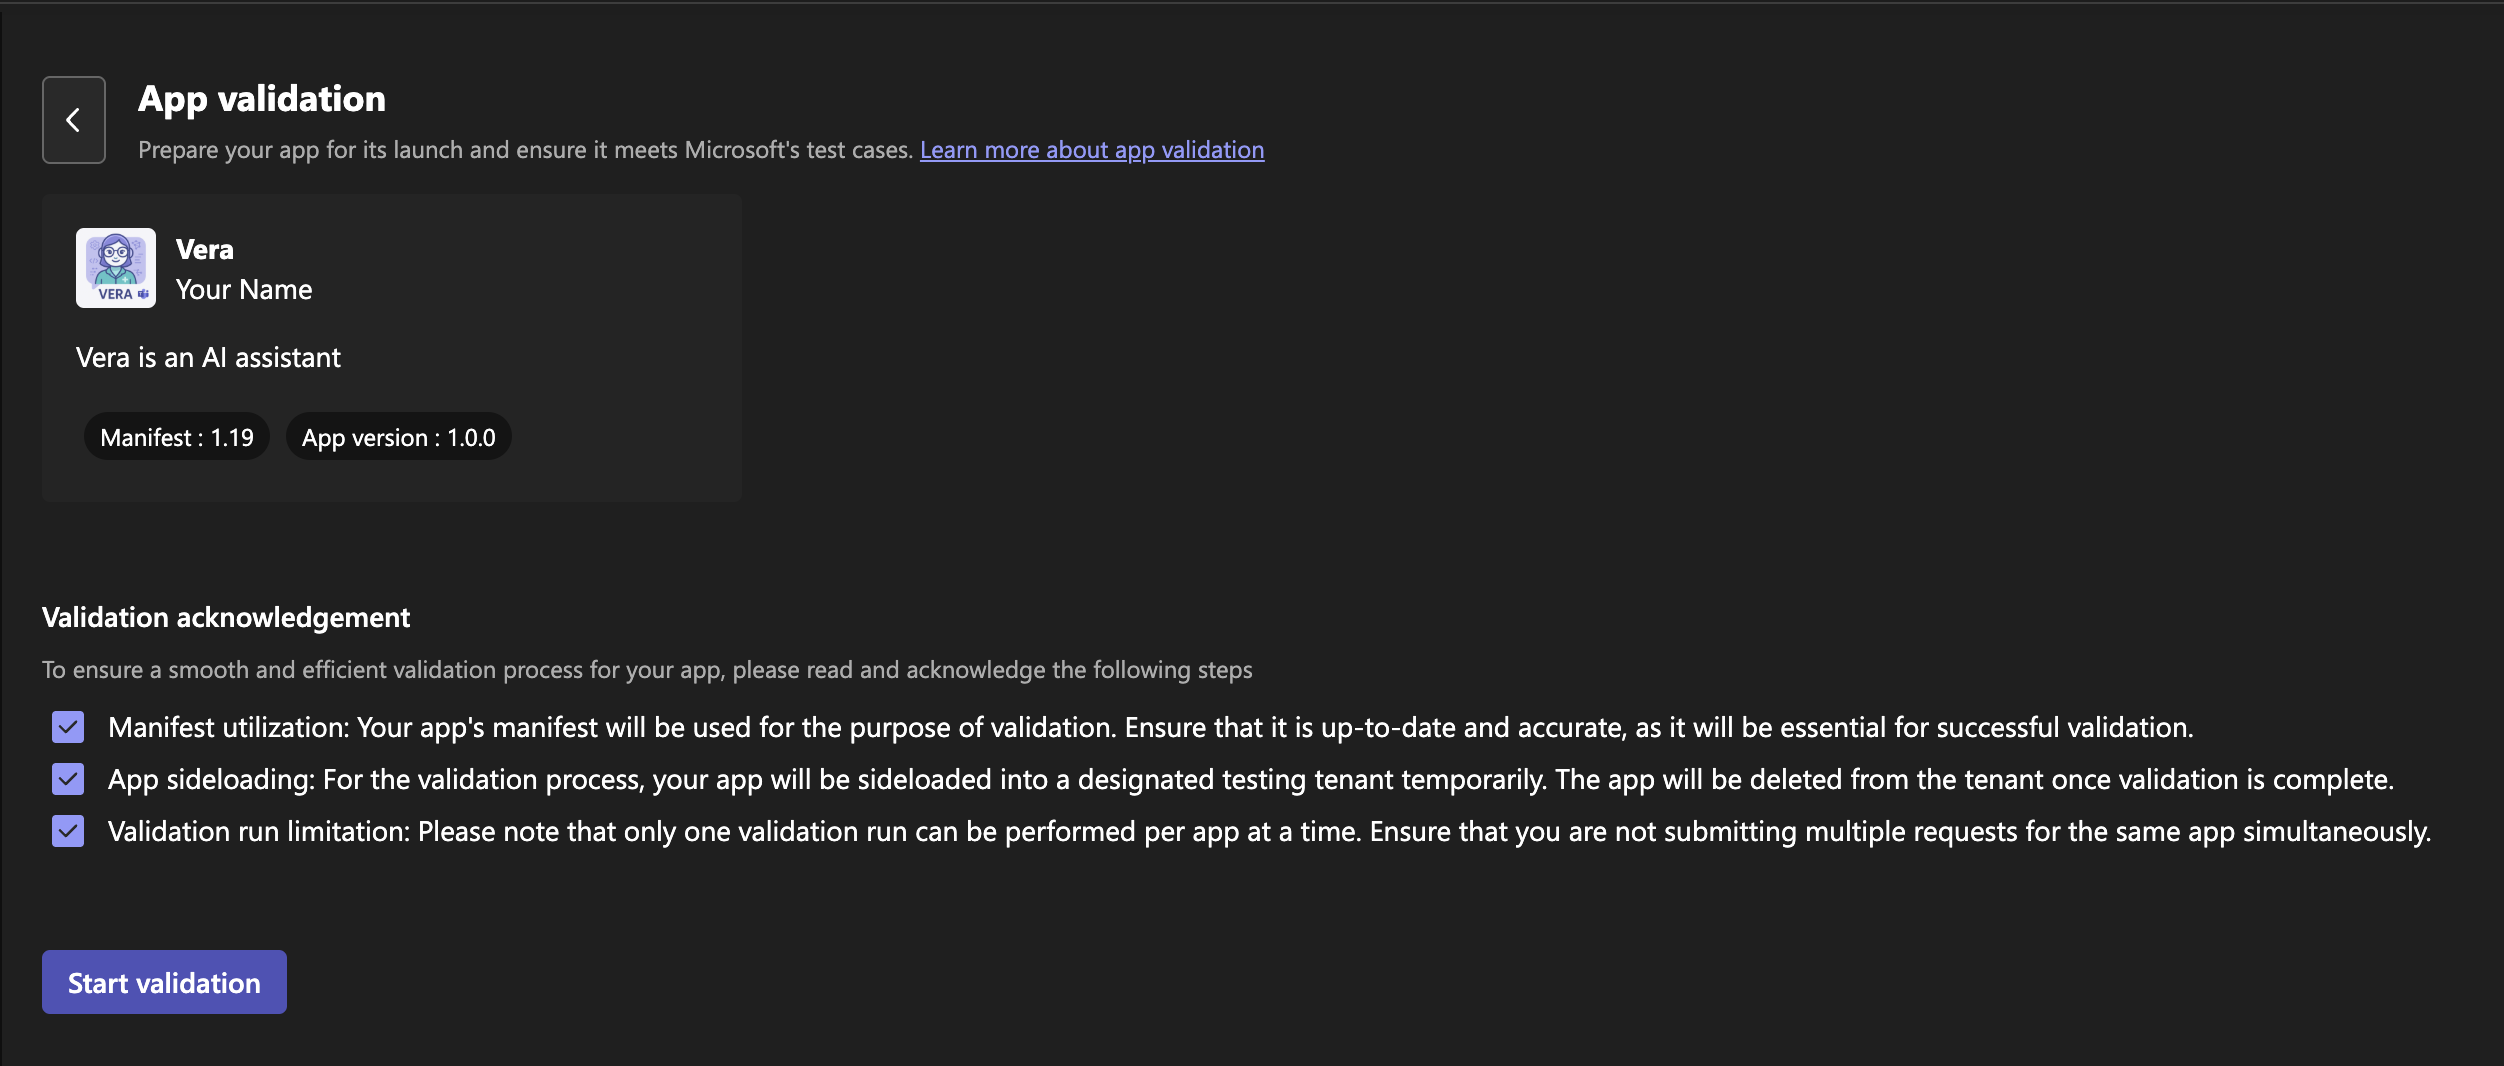
Once you verify everything looks good, click on “App validation” —> Get started.

You’ll see that we’re unable to move forward due to an error - we need to fix the size of our color icon!
I fixed that up (by clicking back to the Branding list, and uploading an appropriately sized image), and then came back to run the validation again. This time no errors are listed.
Lets check the boxes next to each Validation acknowledgment, and click on Start validation.
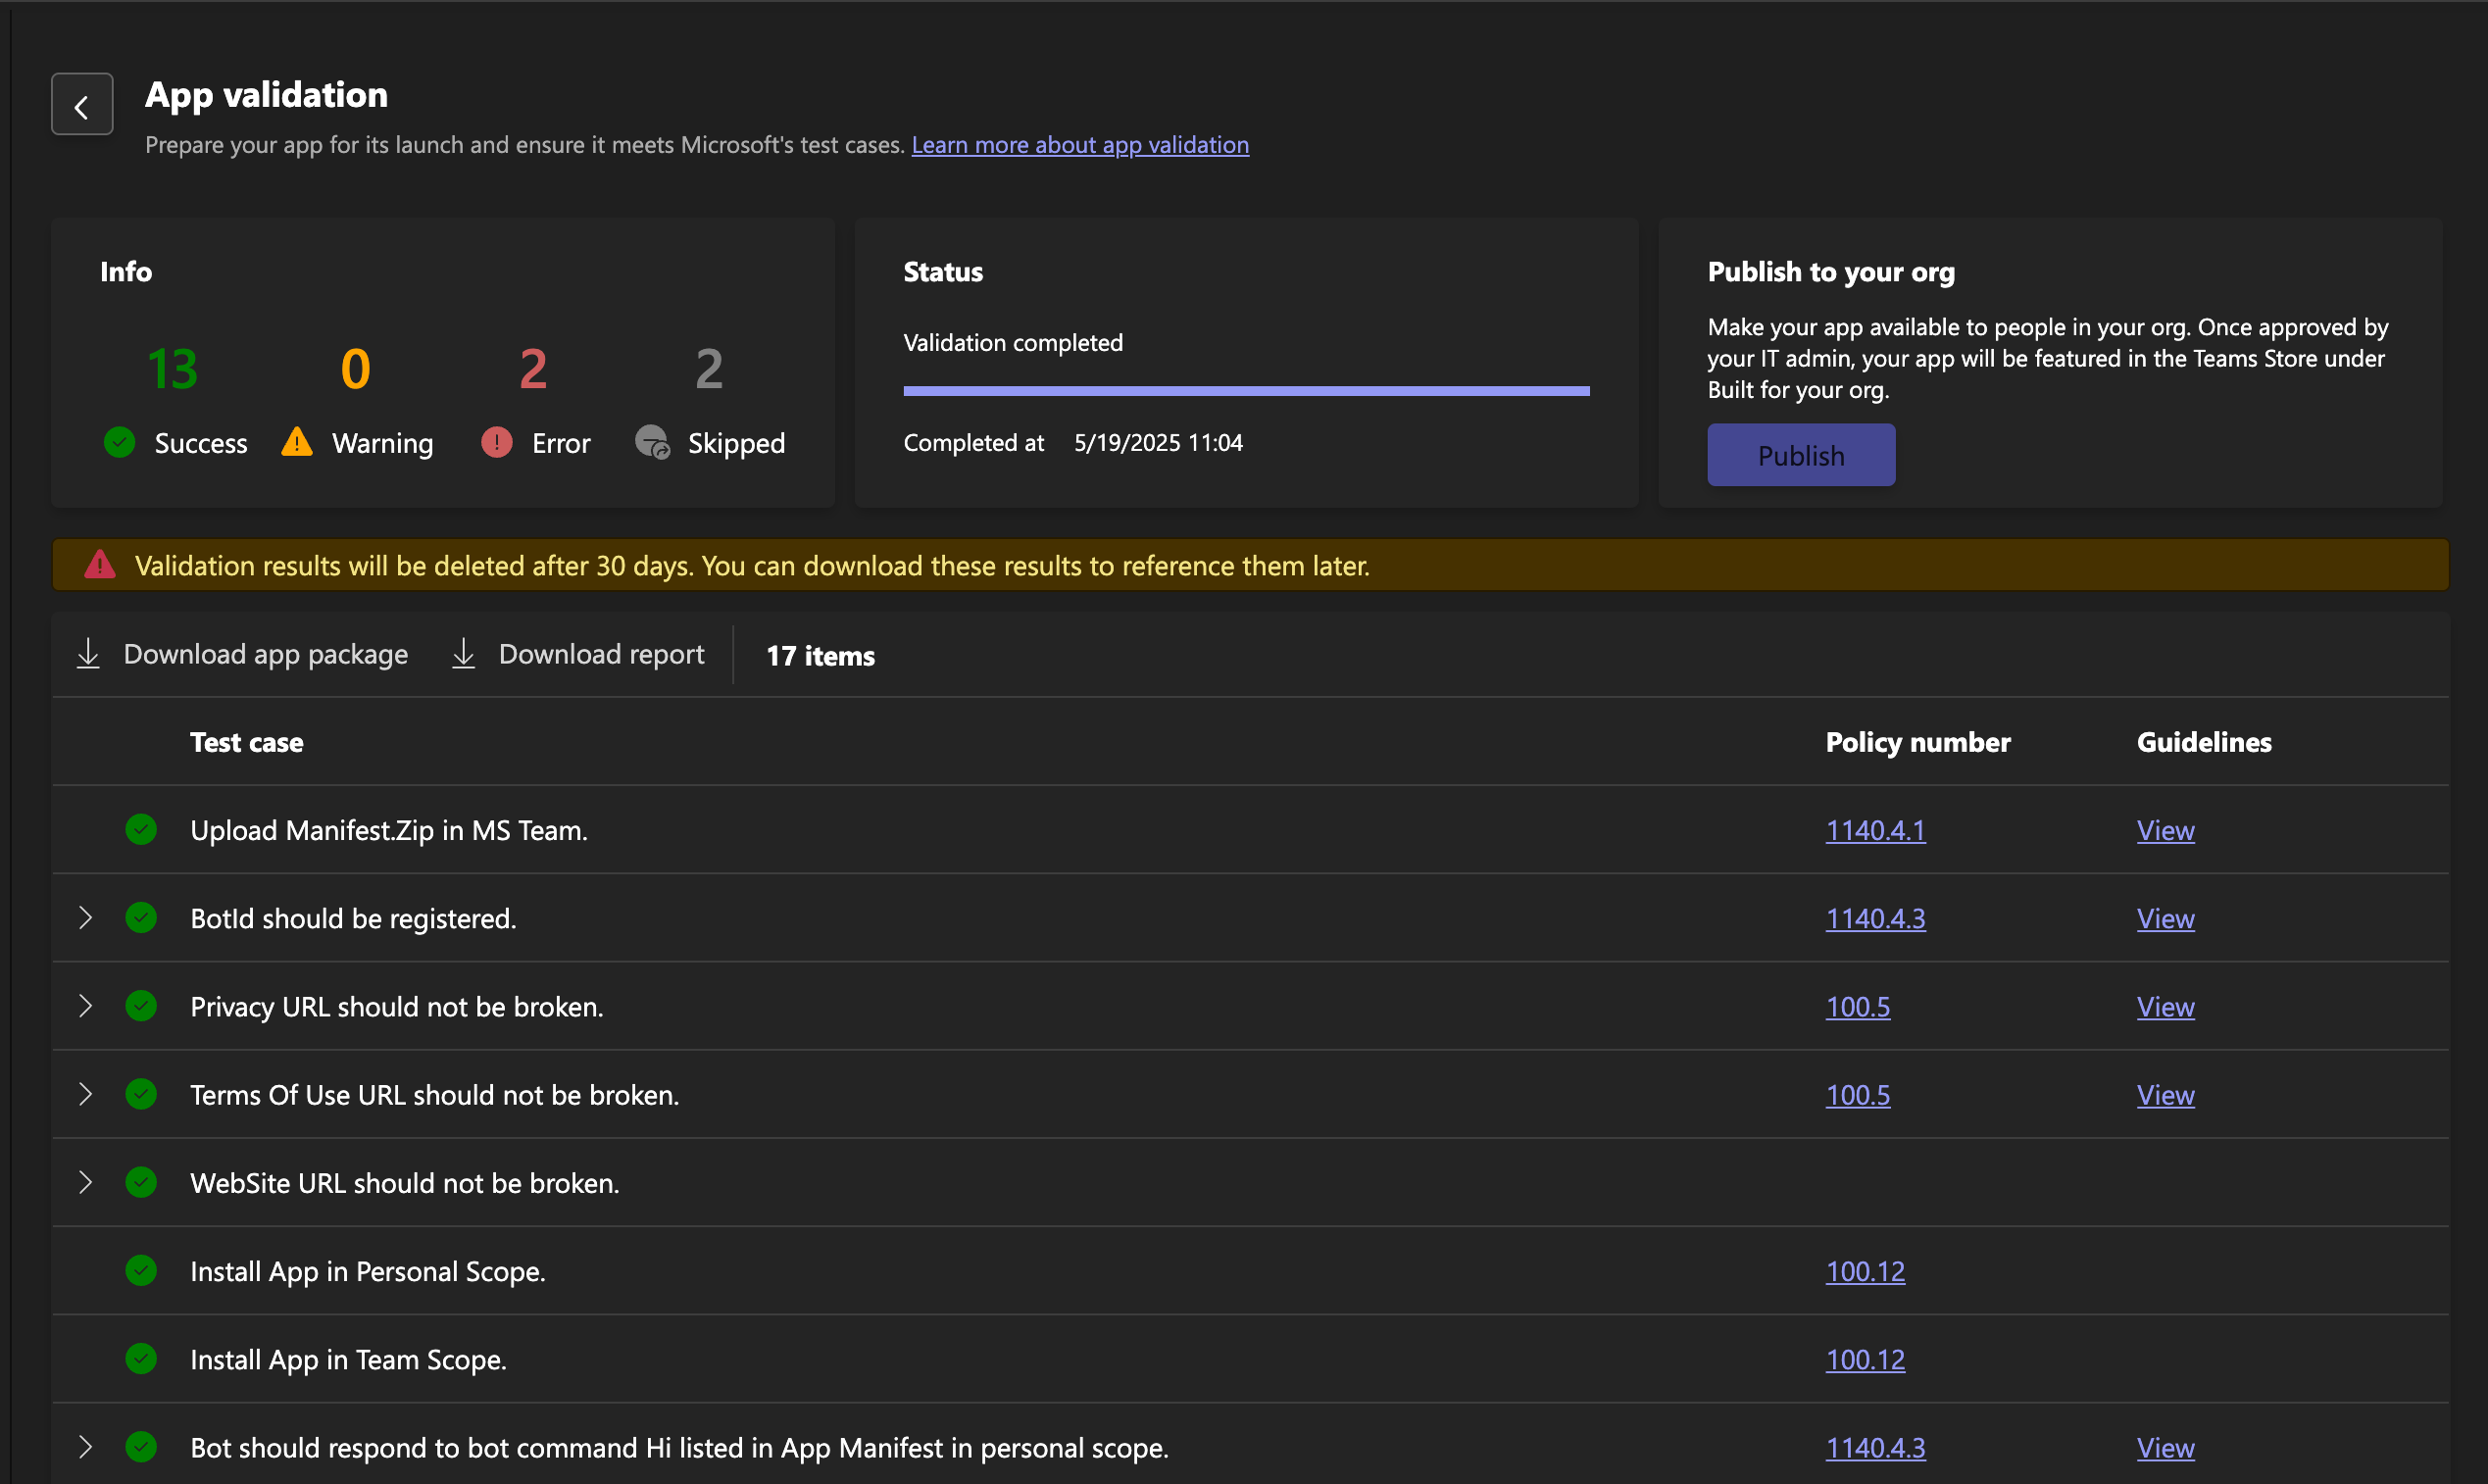
The validation will run for a few minutes. You can refresh the page and navigate away, and come back. Review the errors to make sure things are working as you expect. Here’s an example of one that is working, with no significant errors.
There are some errors below, but this isn’t pass/fail - all the things I care about work. If you want to list your App in the Teams App store for other folks to install, you probably should care more to get an A++ on your test.
Testing / Playing
But you don’t care about some tests, you want to USE the app, right? There’s two ways to do this.
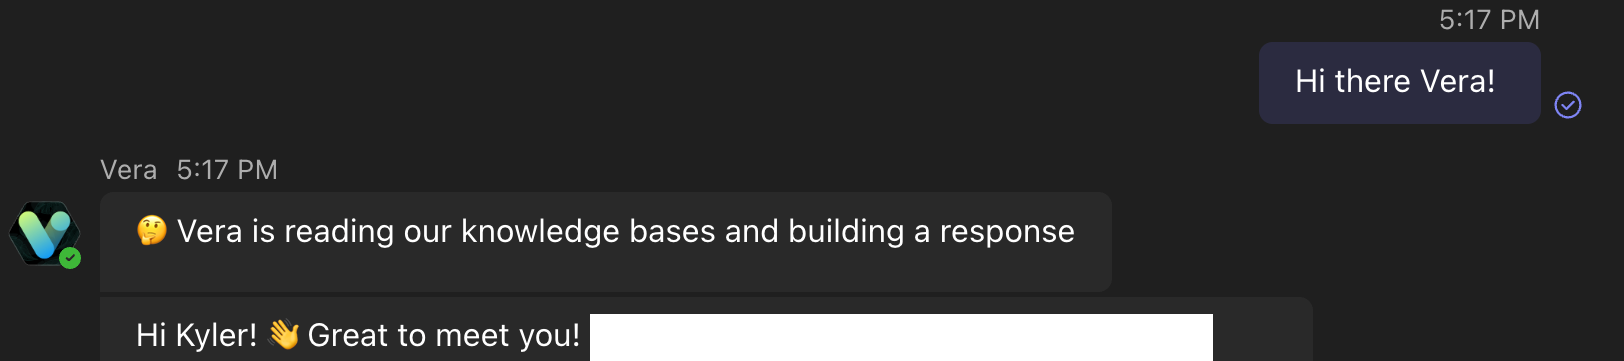
First way, you can “Preview in Teams” which will open the bot (default on the web, but you can use in your App as well) the bot in a 1:1 DM situation. You can attempt to use the bot.
Note 1: If you do this, others won’t be able to see the bot or use it.
Note 2: If you’re following along in order, none of the code has been deployed yet, so of course it won’t work. This is an example of it already having been built.

The way to really get this going is to Publish the app to your Org. That way others can use the bot as well.
In the far bottom left, click on “Publish to Org” and then “Publish your app” purple button below. This will inform your Teams Enterprise Admins that your app is ready for publication.
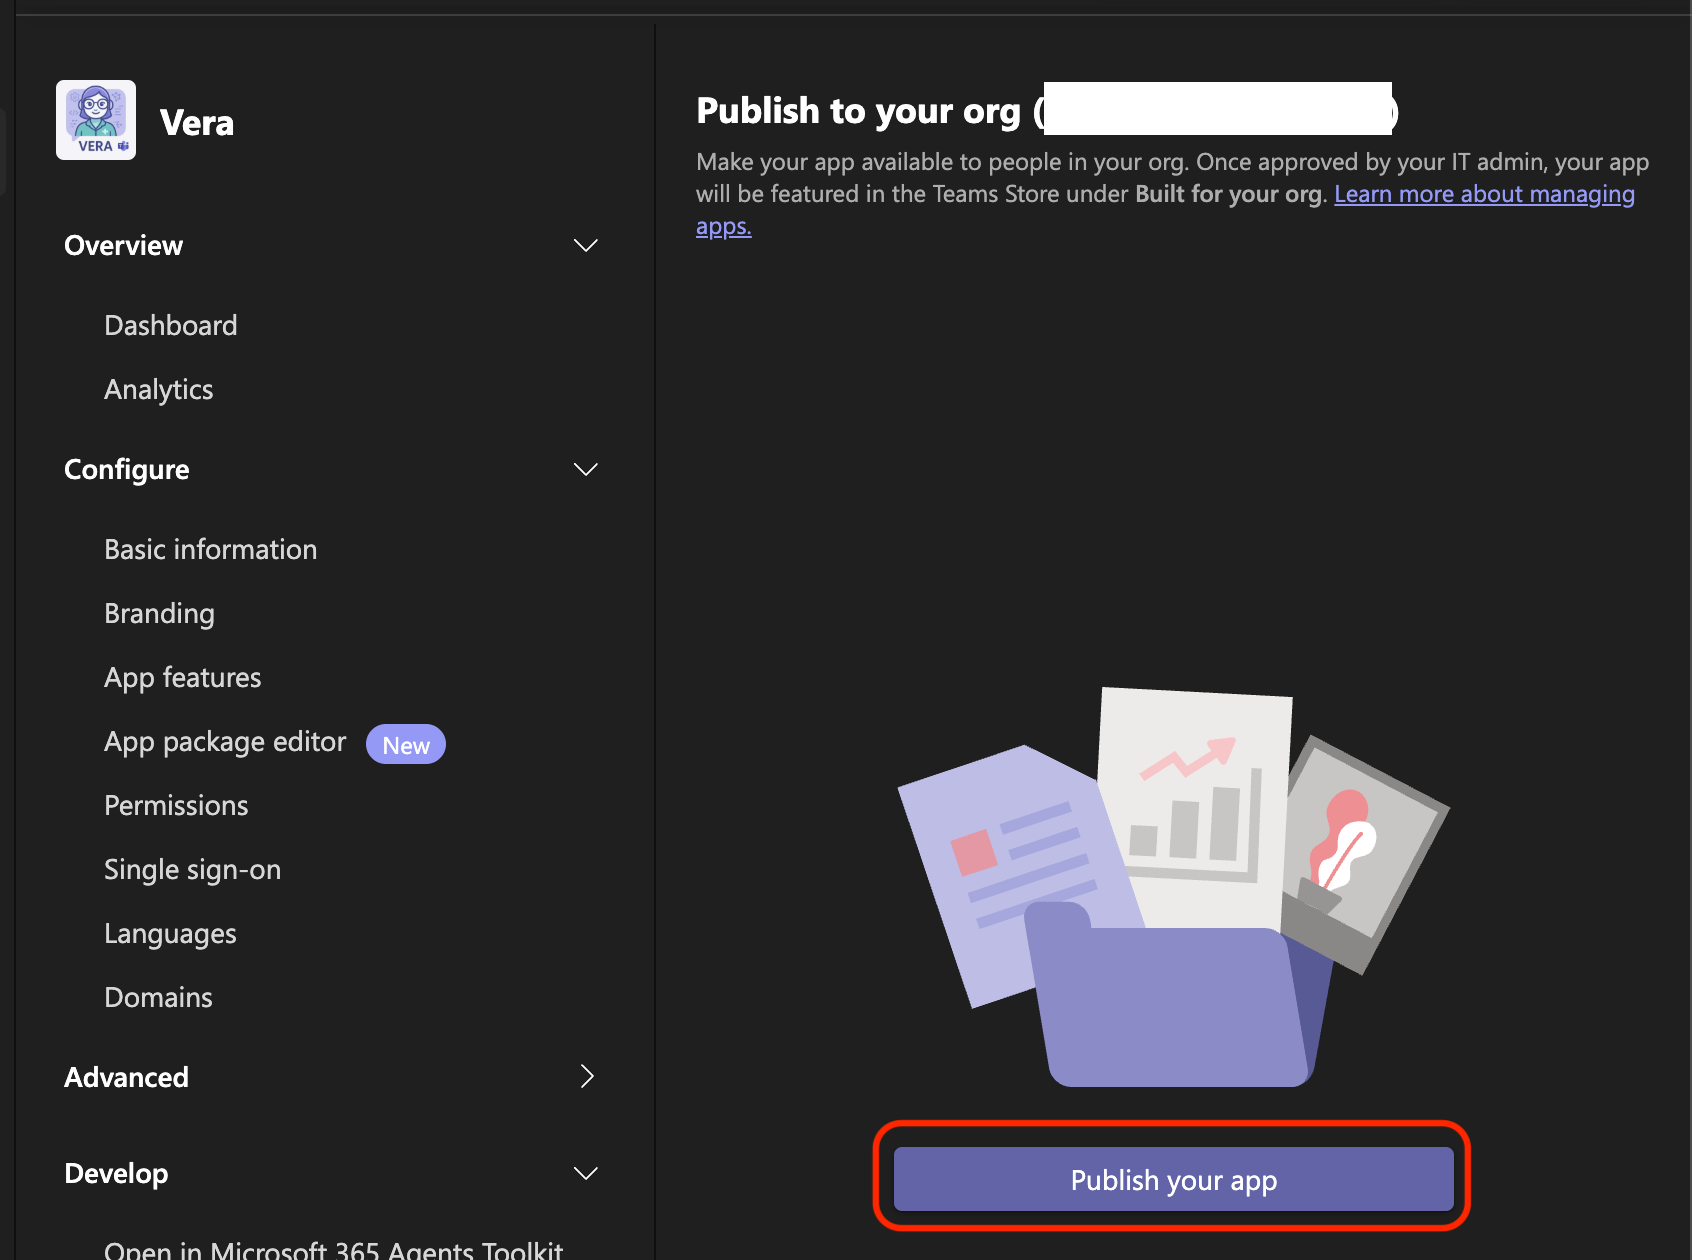
Once the app has been approved, you and your teammates can now use the Bot!!
Summary
This process in Slack takes like 20 minutes, and is largely driven based on understanding permissions and where Slack’s buttons are. Teams makes this process quite complex, by separating out different functionality in a “Bot” resource vs permissions in an “App Registration” resource, and then requiring you to write a Manifest json to identify all the App’s information, and not least to require exactly correctly formatted icons for Teams to consume.
PHEW.
If you’ve made it this far, you rule. We’re going to walk through a great deal of python code in the next few articles, but I think the next one will be about the architecture overall, and what we’re aiming to achieve. There’s a great deal of divergence in how Teams APIs work, as well as where data like attachments are stored when shared via Teams, so our code is similarly different.
Stick around for more. If you want to read the code yourself now, click here for the repo.
Good luck out there!
kyler